Here
I use a mix of Safari, Firefox 1.5.0.x, Camino, IE 6.0 and Opera, I would try and use Camino normally but sometimes it breaks web pages and I have to open them in Safari/Firefox/Opera. I only use IE when absolutely necessary for testing page compatibility and I had IE 7 installed and took it out because it hurt my eyes. Think Opera V4 with bad icons....
Monday, August 21, 2006
Tuesday, August 08, 2006
Automating SQL 2005 Express Edition Backups
SQL2005 Express Edition w/ Management Studio Express looks like it is a very nice DB and management console, it falls down in one place (that I can see) and that is it is missing the maintenance Wizard that was found on SQL 2000.
Now I cant complain as it is a free application and a small stored procedure can restore most of the functionality as regards backups.
Not all the procedures that are required are activated by default and it is very simple to re-activate them. simply copy and paste this code into a text editor and save it as c:/enableprocs.sql
sp_configure 'show advanced options', 1;
GO
RECONFIGURE;
GO
sp_configure 'Ole Automation Procedures', 1;
GO
RECONFIGURE;
GO
sp_configure 'xp_cmdshell', 1
GO
RECONFIGURE
GO
Now execute this command from a "run" prompt
Then just set up a scheduled task in windows to run
Now I cant complain as it is a free application and a small stored procedure can restore most of the functionality as regards backups.
Not all the procedures that are required are activated by default and it is very simple to re-activate them. simply copy and paste this code into a text editor and save it as c:/enableprocs.sql
sp_configure 'show advanced options', 1;
GO
RECONFIGURE;
GO
sp_configure 'Ole Automation Procedures', 1;
GO
RECONFIGURE;
GO
sp_configure 'xp_cmdshell', 1
GO
RECONFIGURE
GO
Now execute this command from a "run" prompt
sqlcmd -S .\SQLExpress -i c:\enableprocs.sql

this enables the Ole Automation Procedures and the XP_CMDshell.

Get the expressmaint.sql script here

extract the script and save the .sql file to c:\expressmaint.sql

execute this command

sqlcmd -S .\SQLExpress -i c:\expressmaint.sql

This installs the expressmaint stored procedure which is necessary for this backup method.

PARAMETERS
| @database | Y | NONE | The target database for the maintenance operation. Valid values are a single database name, ALL_USER which will process all user databases and ALL_SYSTEM which will process all system databases |
| @optype | Y | NONE | The type of maintenance operation to be performed. Valid values are
|
| @backupwith | N | NULL | Specify additional backup options as documented in BOL for the BACKUP WITH command |
| @backupfldr | N | NULL | The base folder to write the backups to. Sub folders will be created for each database |
| @verify | N | 1 | Indicates whether to verify the backup file. Valid values are 1 and 0 with 1 = TRUE and 0 = FALSE |
| @verifywith | N | NULL | Specify additional verify options as documented in BOL for the VERIFY WITH command |
| @dbretainunit | N | NULL | The unit of measure for the @dbretainval parameter. Valid values are minutes, hours, days, weeks, months and copies. The combination of these two parameters determines how long or how many copies of old backup files are kept |
| @dbretainval | N | 1 | The time period or number of copies of old backups to keep |
| @report | N | 1 | Indicates whether to produce a report of the maintenance carried out. Valid values are 1 and 0 with 1 = TRUE and 0 = FALSE |
| @reportfldr | N | NULL | The folder where maintenance reports are written to if @report = 1 |
| @rptretainunit | N | NULL | The unit of measure for the @rptretainval parameter. Valid values are minutes, hours, days, weeks, months and copies. The combination of these two parameters determines how long or how many copies of old reports are kept |
| @rptretainval | N | 1 | The time period or number of copies of old reports to keep |
| @checkattrib | N | 0 | Indicates whether to check the archive bit on a backup file before deleting it. This is a safety check to prevent deletion of files that have not been backed up onto tape. Valid values are 1 and 0 with 1 = TRUE and 0 = FALSE |
| @delfirst | N | 0 | Indicates whether to delete old backups prior to doing the current backup. This is not advisable but can be useful if disk space is limited. Valid values are 1 and 0 with 1 = TRUE and 0 = FALSE |
| @debug | N | 0 | Indicates whether print out debug information such as the commands generated and the contents of the temporary tables used in the procedure. Valid values are 1 and 0 with 1 = TRUE and 0 = FALSE |
This is the script that I use to backup all user databases, save it as  fullbackup.sql in c:\
exec expressmaint
   @database      = 'ALL_USER',
   @optype        = 'DB',
   @backupfldr    = 'd:\backups',
   @reportfldr    = 'd:\reports',
   @verify        = 1,
   @dbretainunit  = 'weeks',
   @dbretainval   = 1,
   @rptretainunit = 'weeks',
   @rptretainval  = 1,
   @report        = 1

If you look at the parameters you will see that it backups all user databases, it puts the backups in d:/backups and the reports in d:/reports
it also retains reports and backups for 1 week.
Then just set up a scheduled task in windows to run
sqlcmd -S .\SQLExpress -i c:\fullbackup.sqlon whatever schedule you like. I recommend daily backups if not every 12hrs.
Monday, July 31, 2006
Trusted Computing
This is a video demonstrating some of the ideas behind "Trusted Computing" from an industry and a personal standpoint.
I like the idea of trusted computing, in that I will choose what to "trust" in as much as if i decide to make a device do something it wasnt designed to do, I can "trust" it and let it operate alongside whatever else I have plugged in.
In the case of industry Trusted Computing will take this away, it will restrict innovation and limit the spread of ideas, it will affect the 2nd hand hardware market as each device could be restricted to its original purchaser.
Thursday, July 27, 2006
Another Funny Video
Found out today how to post youTube videos on blogger, so have gone a bit nuts. This one has been doing the rounds for a while, but it still makes me laugh
Funny Mac Videos
These are some of the funniest mac videos that I have found so far, I hope that they make some more.
Networking:
Gaming:
Performance:
Networking:
Gaming:
Performance:
Tuesday, March 28, 2006
Installation of Debian on a Dell Poweredge 715n
As promised here is a detailed installation guide for debian on a PE715n NAS, in my case I am using it as a high capacity mirrored offsite backup (one onsite, matching one in a different office)
I'm still working on ironing out some of the bugs in my atrocious grammar so don't expect this to be the final version.
I'm still working on ironing out some of the bugs in my atrocious grammar so don't expect this to be the final version.
Installing Debian on a Dell Poweredge 715n NAS
This device is a 1u headless (no keyboard, mouse or monitor) computer, PIII 1ghz w/ 256MB RAM and 4 IDE HDDs accessible through the front bezel. It is designed to be installed using the Dell OpenManage and Kickstart software to install windows, this isn’t the easiest solution in the world, I wasn’t able to get access to the machine to configure it using this method after 4-5hrs work but was able to install debian within an hour of setting to the task (I Was much quicker the second time round)
This document is intended to explain the process for anyone that is interested or has one of these boxes to install and want a free O/S on it.
This install was performed via PXE,
The PXE (Preboot eXecution Environment) as described in the [ftp://download.intel.com/labs/manage/wfm/download/pxespec.pdf specification (v2.1)] published by Intel and Systemsoft is an environment to bootstrap computers using a network interface card independently of available data storage devices (like hard disks) or installed operating systems (like GNU/Linux). ...
This method requires an additional PC with a network port and a serial port. I used two separate machines (desktop w/ serial connection and network connection) and a laptop with a network connection for logging in to the server via SSH post-installation and getting more information off the internet!
The hardware setup is as follows.
Requirements
Crossover RJ45 network cable
Null-Modem serial cable
Active network connection (DHCP server preferred but not essential)
PC w/serial port and network connection
Step 1: configure Host PC for PXE environment
- get tftpd32 from http://tftpd32.jounin.net
- unzip this to any folder
- get the Debian net install from http://ftp.us.debian.org/debian/dists/unstable/main/installer-i386/current/images/netboot/
download the netboot.tar.gz file and the pxelinux.0 file - extract the netboot.tar.gz file to a folder called tftpboot and copy the pxelinux.0 file to this directory as well
- run tftpd32 and go to the settings button (centre at bottom of window)
- make sure the following boxes are ticked
TFTP server, Syslog Server, DHCP Server, Save syslog message, PXE Compatibility, Show Progress bar. Set TFTP Security to none and set the base directory to where you extracted the netboot.tar.gz file, click on ok to return to the main menu - on the DHCP server tab enter the following
IP pool starting address: 192.168.1.1
Size of pool: 10
Bootfile: pxelinux.0
WINS/DNS Server: 0.0.0.0
Default Router: 0.0.0.0
Mask: 255.255.255.0
Domain name:
Additional Option: 0 - click on save (vertical box to right of options)
- Set the “Current Directory” to the directory where you extracted netboot.tar.gz
- Exit tftpd32 and start it again
- Connect the network port on the PXE host pc to the 1st net interface on the powervault using the crossover cable and connect the serial cable as well
- in the tftpboot/debian-installer/i386/ directory there is a folder called pxelinux.cfg.serial-9600 copy the “default” file contained within to the tftpboot/pxelinux.cfg directory and open this file in your preferred text-editor (I used notepad as it was the only one installed on this PC)
- do a search and replace for 9600 and replace it with 115200
- Start hyperterminal or your preferred terminal emulator with the following parameters
Bits per second: 115200
Data bits: 8
Parity: None
Stop bits: 1
Flow control: Xon/Xoff
Step 2: Setup the Powervault
- Power on the server and on the host computer hyperterminal window you will see the serial output of the boot process, there will be a prompt “Press F2 for Setup function” when you see this immediately press F2 (also try ESC+2), the boot will appear to continue but it will bring up a blue menu. Select option 3 “Reinstallation”, the server will bring up the message “This option will be carried out when the server reboots”, press Y to confirm this
- the server will reboot and after about 2-3 min will bring up a prompt(it may be a bit hard to read depending on your terminal emulator) press enter here and the debian installation process will begin.
Step 3: The debian installation pt.1 (Basics)
- Plug in the other network connection to the second Ethernet port on the server
- Select the default language (English)
- The next window will be the network setup, select eth1 as the primary (eth0 is the port connected to the crossover cable) if you have a DHCP server it should pick it up automatically, otherwise you will have to setup up your connection manually
Step 4: The debian installation pt. 2 (partitioning and LVM)
- At the partitioning options screen, select the manual method.
- On the next screen remove any existing partitions from all the drives
- create a new 100MB partition on the first drive, formatted as EXT3 and with a mount point of /boot
- create a new partition on the same drive for the remaining space, use these drives as “physical volume for LVM”
- create new partitions on the rest of the drives of %100 and used as “physical volume for LVM”
- on the main partitioning screen select the Configure LVM and select yes at the prompt (write partition changes to disk)
- select Modify Volume Groups
- add all the partitions available
- give it a meaningful name (PV715 in my case)
- select Modify Logical Volumes > Create Logical Volume
- give it the name “swap” press enter and select the Volume group it should belong to, in this case there is only one
- make it 1GB in size and use the “leave” option to return to the main menu
- repeat steps 10 – 12 for the following details
a name of system and a capacity of 9GB
a name of backups and 100% of the remaining capacity - return to the partitioning menu and edit the LVM partitions at the bottom of the list, format them all as EXT3 except for the Logical Volume named swap, format it as swap. Mount the “system” Logical Volume as / and the backups Logical Volume as /backups
- select “write partition changes to disk” and let the installer format the drives.
Step 5: The debian installation pt. 3 (Finishing touches)
- When it prompts for what kind of system to install remove all options using the spacebar, the only one selected initially is standard setup, this includes an X-server amongst other things and is not necessary for a poweredge installation.
- let the installation complete and give it the required information, Root password, and the initial user account.
- When the installation completes altogether you will be presented with a login prompt on Hyperterminal on the host computer.
- Login using the standard user account and su to root, apt-get install the following options to make management easier: sudo vim nano jed ssh
- edit the /etc/network/interfaces file and give the server a static IP address on eth0 (initially)
- edit the /etc/sudoers file and add in any users that are to have SU privileges.
- do /etc/init.d/networking restart and the installation is complete!
Friday, March 24, 2006
Deploying ColdFusion 5 and MX7 on the same server
I have now successfully installed and have running CF5 and MX7 on the same server using multiple instances of Apache with different configuration files so that they run on different port numbers and each have their own administrator.
This was done so that a single laptop could be used to demo several different applications that the company I work for developed under CF5 and MX7, normally we would just use a dedicated demo serve but where the laptop is going there is no guarantee of connecting to them.
Apparently this is quite simple using Multiple instances of ColdFusion MX and MX7, but in this case it had to be CF5 which proved to be a bit of a pain. I initially thought about using IIS for CF5 with Apache running the MX7 side of things, but as IIS is the Server of the Beast I wanted to go for an all Apache installation.
The machine I started with had Apache 2.0.55 already installed and running CF5 so I will take it from there (see my earlier posts on how to get this working as Macromedia/Adobe dont officially support this combination)
INSTALLATION STEPS
1. Create a new Apache httpd.conf configuration file (copy and paste the CF5 httpd.conf if you like) in a subdirectory of Apache's "conf" folder , I called mine MX7 as this is what will be running on it. I also decided to subdivide the document roots for CF5 sites and for MX7 sites, this is not necessary but I found it made a confusing task a bit more manageable.
2. Create a new folder in your Apaches installation's conf folder (default installation will be c:\Program Files\Apache Group\Apache2\conf) name the folder MX7 and copy the httpd.conf file from the Apache conf folder into here.
3. Edit the httpd.conf file in the MX7 directory using your fave text editor, and amend the following lines
Listen 80 -> Listen 8080
ServerName servername:80 -> ServerName servername:8080
NameVirtualHost 127.0.0.1:80 -> NameVirtualHost 127.0.0.1:8080
make sure that the mod_rewite module is enabled in the LoadModule section(uncomment it in most Apache 2 installations)
4. Create a new VirtualHost with these details
ServerAdmin admin@server.com
DocumentRoot "Path/to/where/CFMX7/Administrator/is/going"
ServerName admin.localhost.com
ErrorLog logs/admin.localhost.com-error_log
CustomLog logs/admin.localhost.com-access_log common
RewriteEngine On
RewriteCond %{SERVER_PORT} !^8080$
RewriteRule ^/(.*) http://admin.localhost.com:%{SERVER_PORT}/$1 [L,R]
Make sure that the DocumentRoot exists!
Add this to your hosts file so
127.0.0.1 admin.localhost.com
5. Install CFMX7 Enterprise edition and select Multiserver configuration when prompted. It willask you for the Apache Binary (c:\Program Files\Apache Group\Apache2\bin\apache.exe) and the location of the configuration files (c:\Program Files\Apache Group\Apache2\conf\mx7) It may complain about a pre-existing installation but you can safely ignore this as this is a copy of the CF5 enabled httpd.conf. When asked where the CFAdministrator is to be installed, give it the location you specified as the DocumentRoot in Step 4
6. Open up a "run" prompt and use the following command (assuming default installation paths etc.)
"C:\Program Files\Apache Group\Apache2\bin\Apache.exe" -f "C:\Program Files\Apache Group\Apache2\conf\mx7\httpd.conf"
Make sure to leave the quotes in for a change! You can also create a shortcut with the same parameters for easy access.
7. Go to "http://admin.localhost.com:8080/cfide/administrator" in your favourite browser and you should get the usual CFAdministrator prompt. You will however be asked about migration, you want to skip this step using the "skip" button as your installation has to exist alongside your CF5 installation and you copied a httpd.conf file that had been modified for CF5.
8. Your demo server is now ready to run applications for CF5 and MX7, now its time to add those VirtualHosts and DSNs to the CFAdministrators.
ADMINISTRATION
Administering CF5 (adding Applications and DataSources)
Edit your CF5 Apache configuration (I'll give you a hint, its not the one in the MX7 subdirectory)
and add a new VirtualHost in the normal way, you can copy and paste the example if you do not have any set up.
Add this directive inside the VirtualHost, I'm not sure if it is necessary for all installations but it was in my case so I am including it here for the sake of completeness.
DirectoryIndex index.cfm
This tells Apache to look for the index.cfm file as the index page, I also specify this in the general directive area.
The installation that I was preparing had a MSSQL server running on localhost, so I was using this as my Datasource.
When adding a DSN I had to add it using the CF5 CFadministrator and then go into Control Panel > Administrative Tools > Data Sources (ODBC) and amend the appropriate entry to make it point to the correct location and enable the connection
Administering CFMX7 (adding Applications and DataSources)
This is slightly more complicated as it is a non-standard deployment of CFMX7.
Firstly make sure that the MX7 enabled instance of Apache is running, if it is not, start it using the command shown above.
To add a new Application to Apache open up the MX7 httpd.conf file (found in the MX7 subdirectory if you followed these instructions) and add a VirtualHost, simply copy and paste the one you created for the CFAdministrator and change the following lines
ServerAdmin admin@server.com
DocumentRoot "Path/to/where/Application/is/located"
ServerName url.for.site
ErrorLog logs/url.for.site-error_log
CustomLog logs/url.for.site-access_log common
RewriteEngine On
RewriteCond %{SERVER_PORT} !^8080$
RewriteRule ^/(.*) http://url.for.site:%{SERVER_PORT}/$1 [L,R]
Once this is done and saved you can exit the MX7 Apache instance and restart it.
In my case I had to add the SQL server DBs as ODBC data sources and then add them in to CFadministrator that way instead of just adding them directly. I won't cover this here because if you are reading this far you obviously know your way around a server install.
There are a few additional notes that were important when running these installations.
If you need to restart the CF5 Apache instance (i.e. when adding a new application) it is necessary to stop the MX7 Instance and then restart CF5 and then start the MX7 instance again.
In the CF5 CFadministrator, Datasources that you added under MX7 will appear, but if you press "verify all connections" they will fail the check, this has the disadvantage that you cannot have a datasource in CF5 with the same name as an MX7 datasource.
If I was to do this installation again I would do some stuff differently, I would install MX7 first and give it port 80, this is down to the fact that in order to install CF5 along with Apache2 it is necessary to configure the httpd.conf file manually, I would also copy the httpd.conf file before installing CFMX7, this should stop it from complaining about migrating settings etc, also if I did install MX7 first, CF5 might barf when it sees the newer directives, I don't know for sure if it would do this, but better safe than sorry.
When the install was done, some of the applications didnt work straight away but this was down to the paths to the files and the URLs being slightly different.
I hope that this is of some use to someone else that comes across it. Next time I will probably try it using a VirtualMachine running Linux or Windows 2000 server edition, hopefully it would be a very tidy solution as the instances would run totally independently! That is an experiment for another day (Saturday, maybe?)
I have another fairly long post coming up detailing a headless install of a Dell Poweredge 715n NAS, using only a crossover network cable and a DB9 serial cable. Stay tuned!
Tuesday, January 31, 2006
SSHD Broken under Cygwin
A word of warning, be very, very careful when changing permissions of anything that Cygwin uses, in fact don't even think about doing it because more likely than not you will break it.
I came across this problem today when I changed the ownership on a Cygwin directory from SYSTEM to Administrators.
This broke SSH and the service would not start, it fails with the message "The service did not start or respond in a timely manner" or some nonsense like that.
The way to fix this is as follows
1. delete the file /var/log/sshd.log
2. open a bash shell and cd to /var
3. chown SYSTEM.none empty
4. chmod 0600 empty
5. cd to /etc and do
6. chown SYSTEM.none ssh*key
7. chmod 0600 ssh*key
you should now be able to start the SSH Daemon by either net start sshd or cygrunsrv -S sshd or starting it through services.msc
Tuesday, January 03, 2006
WOOOO!!! MAC WOOOO!!!
well this Christmas has got to be one of the best ever!
My fantastic wife made it so special for me it almost felt like being a child again, being shooed off to bed so that the presents could be laid out when we came down in the morning and all that.
She also managed to get me my mac mini and a few other bits and pieces without me realising it. This you might think would be simple but normally nothing happens in our house without me knowing about it, probably down to my unceasing need to know everything, even if it is none of my business!
When I unwrapped it on christmas morning there were a few choice words spoken, mostly unrepeatable...
Needless to say that it is one of the nicest bits of engineering that I have had the pleasure of using; OS X is such a joy to use, everything seems to fall to hand without thinking about it. It just seems to come naturally, even to someone with an almost exclusively windows background.
Expose just makes life so much more manageable and iPhoto is amazing. I havent had to install a single driver for any of the peripherals that I have hooked up to it. I still have to get used to some of its quirks like CTRL + "end" does not take you to the end of the line, only the end of the word.
And the fact that I am using a windows keyboard so I need to memorise which windows key maps to which Apple key.
Networking was picked up out of the box and just worked, even our strange VPN connection.
Anyway, I think I need a full day just to play around with it and learn more about where things go and how the permissions work.
I have spent far too long already messing about with the dock, the genie effect is so mesmerising...
Tuesday, December 20, 2005
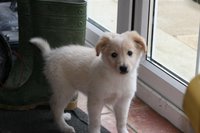
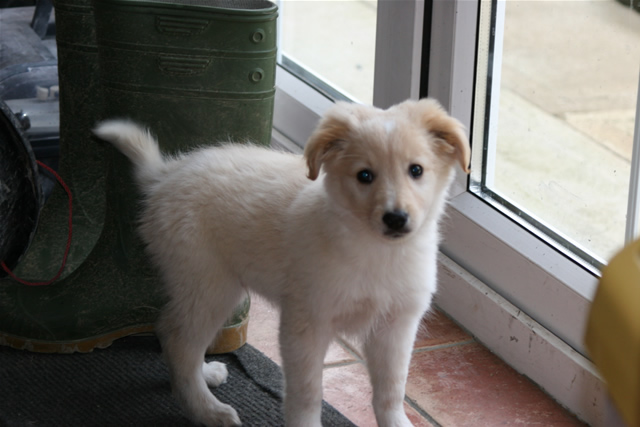
Puppy
Last night was very exciting for me, we got a new puppy in the house.
The story begins with our neighbours getting a new pup as well, ours' brother to be specific. Then our neighbours found out they were going to have another baby and the mother couldn't deal with the smells and the mess that puppies bring. We had planned to give it a home over Christmas and help them rehome it.
We were a bit disappointed when we found out last night that they were going to keep him but thought it was for the best. We had our hearts set on getting a puppy and putting in the effort that is needed so we were going to the local rehoming centre and were going to adopt another.
The neighbours mentioned that their pup had a brother and two sisters that also needed homes, and that they could bring them down so we could have a look at them. We told them just to bring down the dog as we have two already and wouldn't be able to home a bitch.
We kinda discussed it and thought it was a bad idea but as soon as he arrived in with us our minds were made up, we took him there and then, he's called Remus and we have no idea what he is.
No-one has any idea what breed he is apart from being a bitsa (bitsa this and bitsa that) so he could grow to be as big as a big thing or just stay as small as he is now.
I'm heading home at lunchtime to feed him and let him out so I'll take a few photos and post them here, I have one on my camera phone but the quality is awful.
***UPDATE***
As promised here is a photo, didnt have time to take anymore. Might take some more tonight...
Friday, December 02, 2005
360 Launch Day
Well, today started off very interesting for me!
If you don't know it was the official European launch of the XB0x 360 and I was at the front of the queue.
I had to get up at stupid o' clock but I would guess that I was the first person in the town to get one.
It was a miserable cold wet stand outside the shop for an hour and a half and I feel like I want to die as my joints loosen up and the monkeys in my brain unfreeze and starting playing those blasted drums again.
But
so
totally
worth
it
But here's the kicker, I'm not allowed to play it til Christmas. I have a sneaking suspicion that I might be getting a Mac Mini as well but its only a suspicion at the minute...
I'll keep it posted, might "trip" over one when I'm up in the attic.
Friday, November 18, 2005
MAC Watch
I'm currently saving up to treat myself to a shiny new Mac; I've always wanted one and I have now "got permission" to buy one thanks in no small part for my willingness to part with silly amounts of money for a Canon EOS 20D, probably one of the coolest digital SLRs that you can buy without selling 2 or three internal organs.
My initial plan was to get a mac mini and convince the wife to scrap the desktop PC, its just too big and we don't really need all the processing power and storage that I have accumulated over the years.
I thought a Mac mini would fit our needs perfectly and increase the workflow of our little home photography studio. Namely by letting me create a little Automator program that when a photo was dropped on to it, it would rotate to portrait mode, resize to 10x15 or whatever other sizes I decide I want to print on, set the resolution to 300DPI and then print it. This would remove about oh lets say a half dozen steps in photoshop.
Then this interesting article dropped in my inbox and changed all that
http://www.thinksecret.com/news/0511intelibook.html
Now im swinging to getting an iBook and just using it as a workstation with better portability, I would of course be wanting to get another one, just so that if I have it with me, there is still one at home/with the wife.
My wife doesn't use the PC that much anyway, a bit of light photoediting and printing, webcam chats with her dad in Thailand and stepsister on an island in the Philipines, iTunes, some internet browsing and thats about it.
I only need some Linux programs, Dreamweaver and a Microsoft remote desktop connection and I am able to work from home on whatever I need to.
Oh wait, all of those are available for OS X, and even if they weren't I have an old Sony VAIO that can be trundled out when I absolutely, positively want to(have to) gouge my eyes out on Windows 2000 with 64MB RAM.
I'll keep this updated with how the quest for mac progresses, and how much I love/hate it when it arrives.
Thursday, November 17, 2005
Battyness today!
Again, some more .bat scripting to make my life a bit easier!
This time its SQL Enterprise Manager that is misbehaving; for whatever reason the wrong DLL's get registered and when you try to connect to any SQL database server you get and OLE 13686 error saying that you must upgrade Enterprise manager.
What you do is unregister some DLLs, copy the proper ones back in from the SQL install media and then re-register the new DLLs. IN my case the install media lives on a network drive.
@ECHO OFF
:: SQLSRVR.bat
:: Written by Daniel McLaughlin
:: http://danmacs.blogspot.com
ECHO Mounting Network Share as Local Drive
NET USE t: \\NET IP ADDRESS\share\Applications\sql2000\x86\binn /PERSISTENT:NO
CLS
ECHO *********************************WARNING*********************************
ECHO * You Should only run this if you are receiving the OLE 16386 Error *
ECHO * This assumes that you are using the default directory structure *
ECHO * i.e. .../program files/Microsoft SQL Server *
ECHO *********************************WARNING*********************************
ECHO.
ECHO.
PAUSE
ECHO.
ECHO.
ECHO *********************************INFO*********************************
ECHO You Will now unregister the DLLs invlolved with
ECHO SQL Enterprise Manager 2000
ECHO Five (5) Information boxes will appear, click OK on each
ECHO *********************************INFO*********************************
ECHO.
ECHO.
ECHO.
PAUSE
CD "%1:\Program Files\Microsoft SQL Server\80\Tools\Binn"
REGSVR32 /u dtsui.dll
REGSVR32 /u sqlns.dll
REGSVR32 /u sqldmo.dll
REGSVR32 /u sqllex.dll
REGSVR32 /u sqlmmc.dll
ECHO.
ECHO *********************************INFO*********************************
ECHO You Will now re-register the DLLs invlolved with
ECHO SQL Enterprise Manager 2000
ECHO Five (5) Information boxes will appear, click OK on each
PAUSE
ECHO STEP 1
ECHO.
ATTRIB -R "%1:\Program Files\Microsoft SQL Server\80\Tools\Binn\dtsui.dll"
ATTRIB -R "%1:\Program Files\Microsoft SQL Server\80\Tools\Binn\sqlns.dll"
ATTRIB -R "%1:\Program Files\Microsoft SQL Server\80\Tools\Binn\sqldmo.dll"
ATTRIB -R "%1:\Program Files\Microsoft SQL Server\80\Tools\Binn\sqllex.dll"
ATTRIB -R "%1:\Program Files\Microsoft SQL Server\80\Tools\Binn\sqlmmc.dll"
ECHO STEP 2
ECHO.
DEL "%1:\Program Files\Microsoft SQL Server\80\Tools\Binn\dtsui.dll"
DEL "%1:\Program Files\Microsoft SQL Server\80\Tools\Binn\sqlns.dll"
DEL "%1:\Program Files\Microsoft SQL Server\80\Tools\Binn\sqldmo.dll"
DEL "%1:\Program Files\Microsoft SQL Server\80\Tools\Binn\sqllex.dll"
DEL "%1:\Program Files\Microsoft SQL Server\80\Tools\Binn\sqlmmc.dll"
CD \
ECHO STEP 3
ECHO.
XCOPY "t:\dtsui.dll" "%1:\Program Files\Microsoft SQL Server\80\Tools\Binn"
XCOPY "t:\sqlns.dll" "%1:\Program Files\Microsoft SQL Server\80\Tools\Binn"
XCOPY "t:\sqldmo.dll" "%1:\Program Files\Microsoft SQL Server\80\Tools\Binn"
XCOPY "t:\sqllex.dll" "%1:\Program Files\Microsoft SQL Server\80\Tools\Binn"
XCOPY "t:\sqlmmc.dll" "%1:\Program Files\Microsoft SQL Server\80\Tools\Binn"
cd "%1:\Program Files\Microsoft SQL Server\80\Tools\Binn"
REGSVR32 dtsui.dll
REGSVR32 sqlns.dll
REGSVR32 sqldmo.dll
REGSVR32 sqllex.dll
REGSVR32 sqlmmc.dll
ECHO File Copy Successful
ECHO Thank You For Using this utility
net use t: /d
PAUSE
cd \
CLS
To use this script, CD to the directory where it lives and run it from the command line with one additional parameter, the drive that Enterprise Manager is installed on. so for example
c:\> sqlservr.bat c
Wednesday, November 16, 2005
Full of scripty goodness
This is one of the batch scripts that I wrote today, basically what it does is log in to a samba server that is doing NT Authentication with Active Directory, takes user input to specify the source folder on the remote server and the target folder on their local machine. To do this it creates a temporary mapped drive on their local machine that is destroyed when the script runs through, its not a persistent connection so if they screw up or kill the script it won't leave the mapped drive sitting on their machine.
The specification I was given for this was:
"I need to copy an entire folder down to my laptop so that if i am travelling it will have the latest documents in it,
I want to be able to specify the directory to copy the files into and I don't care if it overwrites the existing files/folders"
Why they couldn't just copy the files down through Windows Explorer I will never know, but it filled an hour or so and I know lots more about batch scripts than I did before! I probably would have written it so that it didnt ask for any user input apart from the username and password but that would only have worked if the target and source directories were constant, and obviously they won't be.
This would probably have been much simpler to write and much more powerful in Linux (rSync goodness abound!) but this way it minimises the amount of additional software and extra permissions that people need (cygwin on their local machine and a login on the remote linux box).
I might in the future set it up so that the user can specify the remote server as well and navigate through the directory structure.
There are some limitations on its behaviour, I'm still discovering some of the stranger things that it does, i.e. if you are a smart arse and feed it a file within a folder as the target (i.e. work/thisisafile.xls) it will create teh work folder and then another folder beneath it called thisisafile.xls and this folder will contain a file of the same name. This shouldnt be a problem but I would rather it didnt do it. It serves its purpose in the mean time and it may never be modified again but it is something that would annoy me immensely.
@ECHO OFF
:: copydir.bat
:: Written by Daniel McLaughlin
:: http://danmacs.blogspot.com
SET SOURCE=
SET TARGET=
ECHO Mounting Network Share as Local Drive
ECHO.
ECHO Enter your username and close by pressing Enter, F6, Enter.
ECHO You Will Be Prompted for your NT Password
FOR /F "tokens=*" %%A IN ('TYPE CON') DO SET USERNAME=%%A
NET USE t: \\Target IP Address OR Hostname\shared dir * /USER:DOMAIN\%USERNAME% /PERSISTENT:NO
CLS
ECHO.
ECHO Directory Listing for "Description of the target folder"
ECHO.
dir /A:D /W "t:\Target folder\"
PAUSE
ECHO.
ECHO Type in the source directory path
ECHO *********************************WARNING*********************************
ECHO * Specifying a null directory will copy the ENTIRE folder *
ECHO * *
ECHO * If you accidentally specify the entire folder press CTRL +C *
ECHO * The Temporary Drive (t:) Created will be removed on your next reboot *
ECHO *********************************WARNING*********************************
ECHO.
ECHO End directory entry by pressing Enter, F6 then Enter again.
ECHO.
:: Only one single command line is needed to receive user input
FOR /F "tokens=*" %%A IN ('TYPE CON') DO SET SOURCE=%%A
:: Use quotes if you want to display redirection characters as well
CLS
ECHO.
ECHO Type in the ***full*** target directory path
ECHO i.e. c:\documents and settings\user\my documents
ECHO Files will be put in a subfolder with the same name as the target dir.
ECHO End directory entry by pressing Enter, F6 (or Ctrl+Z), Enter.
ECHO.
:: Only one single command line is needed to receive user input
FOR /F "tokens=*" %%A IN ('TYPE CON') DO SET TARGET=%%A
CLS
ECHO *********************************INFO*********************************
ECHO You Have Specified Source(remote) Folder %SOURCE%
ECHO You Have Specified Target(local) Folder %TARGET%
ECHO If you accidentally specify the wrong folder(s) press CTRL +C
ECHO The Temporary Drive (t:) Created will be removed on your next reboot
ECHO Otherwise
PAUSE
XCOPY /-Y /W /E "t:\target folder\%SOURCE%\*.*" "%TARGET%\%SOURCE%" /s
ECHO File Copy Successful
ECHO Thank You For Using this utility
PAUSE
net use t: /d
CLS
Obviously you wont be an eejit and just copy this into notepad and expect it to run, there are a few parts that you need to edit in order for it to work for you, these are in italics and bold just so that they are easy to spot.
Monday, November 14, 2005
del.icio.us
I have been using del.icio.us for a while now, I found it by accident and thought it was a fantastic tool, I recommend it to anyone who will listen and anyone who gives it a go tends to keep using it.
It works for me because i could be at any number of PCs and still have access to my favourites list.
I know I could set u p a HTML page with my bookmarks on it, but why would I do that when someone else can do it for me, and I can share what i found with other people!
There is also the "popular" section where you can see the most bookmarked pages over a period of time.
I stumbled across tagrolls on their site and I thought I would use it now to show people exactly what i might be looking at at any one point in time. Unfortunately, it doesnt work with blogger as you can't incorporate javascript. Pants.
Wednesday, November 09, 2005
protect web directories using .htaccess
Here's a tutorial on how to set up password protection under Apache 2.0.54 and Windows 2000
it takes about 5 minutes to set this up and provides an adequate level of protection for files that are web accessible anyway!
1. Open up a command prompt and navigate to your apache2/bin directory, it will be c:\program files\apache group\apache2\bin if you used a default apache installation
2. Type the following command "htpasswd -c filename username" where you choose the name of the password file (remember what you called it) and the name of the user that you want to add to the user list, you will be prompted twice for a password
3. Copy the new password file to a directory outside your web root, you dont want anyone being able to see it
4. You now need to edit your httpd.conf file, if you search for the following string "FileAccessName" that will take you to the correct place in the file. Create a new line after that section and add the following text:
<directory>
AllowOverride All
Options None
Order deny,allow
</directory>
Where protected directory is the full path to the directory that needs to be password protected i.e. "c:/webroot/site/www.home.com/securearea"
5. Browse to that directory and create a new text file called htaccess.txt, inside this add the following text
AuthUserFile "path/to/your/password/file"
AuthName "The Message you wish to appear on the prompt that pops up"
AuthType Basic
<Limit>
require valid-user
</Limit>
6. Save this and rename it to .htaccess using your favourite editor (NOT NOTEPAD!!!)
7. Restart apache and try to browse to your newly protected directory, you should be presented with a dialogue box asking you for a username and password (the ones you created earlier!)
This will give you rudimentary protection for the files contained in that directory but there is much more that htaccess can do, for example it can limit access to a specific IP range, so say you have an internet site that is part intranet, you could limit access to the intranet subsection so that it is only accessible to users that have a 10.0.0.0 or a 192.0.0.0 IP address, i.e. those users on the internal network.
I can't cover all the possibilities that this presents, there are simply too many permutations, but there is plenty of help out there, remember google is your friend!
Wednesday, October 26, 2005
Apache 2 Virtual hosting, mutiple IP addresses and Coldfusion fuckwittery
This is a quick post this time, it turns out that if you are using Virtual Hosts in Apache with multiple IP Addresses on the same NIC (having two or more sites with SSL), you should not have the cfadministrator virtual host under the same IP Address; it causes whatever site is hosted on that IP address to be hosed and have incredibly slow response/load times.
This has been a pain in my ass for about 2 weeks, I had until just recently not been able to get to the bottom of why two identical sites on the same server etc etc have such completely different behaviours.
I decided to bite the bullet today and step through the entire site to try and eliminate any differences and get to the bottom of the speed problem.
Needless to say the cfadmin IP address was swiftly changed to a different one and the difference was night and day.
So to summarise, dont have Cfadmin and a live site on the same IP address if you need more than one IP address on the same NIC. I don't think that this would be a common problem, but if you do come across it and this helps you drop me a comment!
This was intended to be a very short post but... I'll stop now
Almost home time, not too long left now....
Tuesday, October 25, 2005
Macromedia Coldfusion 5 and Apache 2.0.55
It seems that every post so far is about apache in so form or fashion, well it just so happens that is what I spend most of my time doing. Im also trying to compile all of the useful tips, tricks and code snippets that I have found into one place so that I can find them when I need them instead of having to thumb through a slightly "abused" notebook and hoping that its not in the other one that I use from time to time...
For reasons unbeknownst to me, I have been asked to install ColdFusion 5 on an Apache 2 box.
Normally something as simple as installing some software would not merit a blog post, let alone a set of instructions! However, Macromedia in their infinite wisdom decided to only support Apache 2 with Codfusion MX and newer.
You would think(hope) that it would just be a matter of copying the required modules from the macromedia site or from and existing MX installation but No, life is never that simple. What you really need to do is go and get the third party module from here (nextron.ch).
Just drop that into your Apache "Modules" directory and add the following lines to your httpd.conf
LoadModule coldfusion_module modules/mod_coldfusion.so
AddHandler type-coldfusion cfm dbm
Once this is done and you have restarted apache just load up your cfadministrator page (localhost/CFIDE/administrator) and you are laughing.
Monday, October 24, 2005
Apache 2 and modssl
A few months ago I did a complete setup of Apache 2.0.54 and the modssl package under Windows 2000 Server. This morning I had to add a renewed certificate so I decided to start my blog and put the guides that I used and edited up online.
Lets just say its not without its hoops to jump through to get your Apache installation working under Windows!
There are a few places where you could go wrong and not realise it and some of the guides arent totally accurate so I decided to collate my own with all the caveats that are associated with it. There is an additional guide featured after this one for moving a secure cert from IIS 5/6 to Apache 2 with modssl.
Renewing the certificates with Thawte is quite easy as long as you follow their guidelines and don't forget which key goes with which certificate! Its easy to recover from this but Apache gives very few indications what is wrong (no error message on startup and no entries in error log).
You can find which certificate matches which key using the following commands
To view the certificate :
openssl x509 -noout -text -in certificate file
To view the key:
openssl rsa -noout -text -in keyfile
The exponent and the modulus should match in each, if not then its not the correct pairing.
N.B. Apache under Windows doesnt support passphrases on the key, if you do manage to miss this instruction and in your haste to follow the on-screen instructions, you can remove the passphrase by using the following command
openssl rsa -in file1.key -out file2.key
where file1.key is the key with passphrase and file2.key is the same key with the encryption removed. You will be asked for the passphrase for file1.key when you run this so if you don't remember what it is you are SOOL.
Enjoy the guides below, credit is given where credit is due.
Apache 2.0.54 with Modssl installation guide, adapted from the guide found on www.thompsonbd.com, kudos for helping me get my own installation setup.
Moving a certificate from IIS 5/6 to Apache 2 (good for you!)
The majority of this is copied from the Thawte guide, there's is mainly about moving it to a Linux platform so there are a few additional tricks that need doing before
Lets just say its not without its hoops to jump through to get your Apache installation working under Windows!
There are a few places where you could go wrong and not realise it and some of the guides arent totally accurate so I decided to collate my own with all the caveats that are associated with it. There is an additional guide featured after this one for moving a secure cert from IIS 5/6 to Apache 2 with modssl.
Renewing the certificates with Thawte is quite easy as long as you follow their guidelines and don't forget which key goes with which certificate! Its easy to recover from this but Apache gives very few indications what is wrong (no error message on startup and no entries in error log).
You can find which certificate matches which key using the following commands
To view the certificate :
openssl x509 -noout -text -in certificate file
To view the key:
openssl rsa -noout -text -in keyfile
The exponent and the modulus should match in each, if not then its not the correct pairing.
N.B. Apache under Windows doesnt support passphrases on the key, if you do manage to miss this instruction and in your haste to follow the on-screen instructions, you can remove the passphrase by using the following command
openssl rsa -in file1.key -out file2.key
where file1.key is the key with passphrase and file2.key is the same key with the encryption removed. You will be asked for the passphrase for file1.key when you run this so if you don't remember what it is you are SOOL.
Enjoy the guides below, credit is given where credit is due.
Apache 2.0.54 with Modssl installation guide, adapted from the guide found on www.thompsonbd.com, kudos for helping me get my own installation setup.
1. Caveats
This tutorial assumes that you already have Apache2 installed and working on a Windows server.
You have already copied mod_sll.so from the Apache_2.0.52-Openssl_0.9.7e-Win32 extracted files into your apache installation Modules Directory.
This assumes that you are only using one secure cert on the server, if you require more than one secure cert on the server please see section 6.
2. Needed Files
Files that you will need can be downloaded from this website. These are not necessarily the most up-to-date, but they worked for my install so I have included them here. You will need to download both Apache_2.0.52-Openssl_0.9.7e-Win32.zip and Openssl-0.9.7e-Win32.zip
Unzip both of these files to seperate folders.
3. Setting Up OpenSSL
Copy the files ssleay32.dll and libeay32.dll from the OpenSSL folder to WINNT\System32. Double check that you make sure you copied the dll's and not the lib's.
You also need to download openssl.cnf into the same folder where you unzipped OpenSSL. Windows will remove the .cnf and will make this file look like a dialup icon. Just ignore it. Just make sure you have the file in the right place.
Download ssl.conf and place it in the Apache2/conf directory.
4. Creating a test certificate
Open a command prompt. Navigate to where you unzipped OpenSSL.
openssl req -config openssl.cnf -new -out my-server.csr
You can replace my-server.csr with whatever you want aslong as the extention is .csr. When asked for "Common Name (eg, your websites domain name)", give the exact domain name of your web server (e.g. www.my-server.dom). The certificate belongs to this server name and browsers complain if the name doesn't match.
openssl rsa -in privkey.pem -out my-server.key
This removes the passphrase from the private key. You MUST understand what this means; my-server.key should be only readable by the apache server and the administrator. You should delete the .rnd file because it contains the entropy information for creating the key and could be used for cryptographic attacks against your private key.
openssl x509 -in my-server.csr -out my-server.cert -req -signkey my-server.key -days 365
This creates a self-signed certificate that you can use until you get a "real" one from a certificate authority. (Which is optional; if you know your users, you can tell them to install the certificate into their browsers.) Note that this certificate expires after one year, you can increase -days 365 if you don't want this.
Create a directory in the Apache folder name Apache2/conf/ssl and move my-server.key and my-server.cert into it.
5. Configuring Apache and mod_ssl
Open the httpd.conf file and locate the LoadModule directives. Add
LoadModule ssl_module modules/mod_ssl.so
After add
| SSLMutex default |
In the VirtualHost directives add the following below the existing virtual host for the http host
|
|
Open the ssl.conf file and set the correct www.my-domain.com and DocumentRoot. You will place the location of the secure material in the " " after DocumentRoot. Change the VirtualHost __default__ to the IP address of the virtual host you are using.
6. Multiple Secure Certificates on the same server
Because of limitations in the SSL and HTTPS Specification it is only possible to have one secure cert per IP address, in order to overcome this the NIC that is used to connect to the network must be configured with N additional IP addresses where N is the number of secure certificates that are required. This is accomplished using the following method (Applicable to Windows servers only)
- Go to the properties page of the NIC that you are using to connect the server to the internet/target network
- Select Internet Protocol (TCP/IP) and click on properties
- Click on the advanced button
- Then click “Add” in the IP Addresses section, specify the additional IP address you would like the NIC to be configured with, the subnet mask will usually remain the same
Once this is completed you can continue configuring httpd.conf and ssl.conf for the apache setup.
SSL Configuration
Copy the entire virtualhost configuration already present from step 5 and paste it after the closing virtualhost tag ()
Change the relevant sections as specified in step 5, being careful to change the IP address configured as well
HTTPD Configuration
All that requires modification in this section is to add the new secure virtualhost with the same instructions that you followed in step 5 again being careful to change the IP address. You will also have to add an additional line in the “listen” directives specifying the additional IP addresses and ports(listen 12.34.56.67:80). You don't need the listen 12.34.56.78:443 directive as this is taken care of in the ssl.conf file
It is usually easiest to keep the http and https virtualhosts on the same IP address as to avoid confusion.
Moving a certificate from IIS 5/6 to Apache 2 (good for you!)
The majority of this is copied from the Thawte guide, there's is mainly about moving it to a Linux platform so there are a few additional tricks that need doing before
To Move a Certificate from IIS 6.0 to Apache do the following:
Create an MMC Snap-in for Managing Certificates:
1. Start > run > MMC
2. Go into the Console Tab > 'File' > 'Add/Remove Snap-in'
3. Click on 'Add' > Click on 'Certificates' and click on 'Add'
4. Choose 'Computer Account'
5. Choose 'Local Computer'
6. Close the 'Add Standalone Snap-in' window.
7. Click on 'OK' at the 'Add/Remove Snap-in' window.
Export your certificate and private key .pfx file from IIS6:
1. Open the Certificates (Local Computer) snap-in you added in the last section, navigate to Personal, and then to Certificates
2. You will see your Web server certificate denoted by the CN (Common Name) found in the Subject field of the certificate (using Microsoft Internet Explorer, you can easily view the certificate to see the Common Name if you are unsure)
3. Right-click on the server certificate, select All Tasks, and then click Export
4. When the wizard starts, click Next. Choose to export the private key, and then click Next
NOTE: If you export the certificate for use on an IIS Web server, do not select Require Strong Encryption.This option causes a password prompt every time an application attempts to access the private key, and causes IIS to fail.
5. The file format you will want to choose is the Personal Information Exchange (though you can select from several options). This will create a PFX file.
Notice that you can export any certificates in the certification path by selecting the option on this screen. This is very handy if your certificate was issued by a non-trusted certificate authority (for example, Microsoft Certificate Server).
Only choose delete the private key if the export is successful to be sure it is not left on the computer (for example if your migrating from one server to another).
6. Click Next, and then choose a password to protect the PFX file. You will need to enter the same password twice to ensure that the password is typed correctly. When you have completed this step, click Next.
7. Choose the file name you want to save this as. Do not include an extension in your file name; the wizard will automatically add the PFX extension for you.
8. Click Next, and then read the summary.
Pay special attention to where the file is being saved to.
If you are sure the information is correct, choose Finish.
9. You now have a PFX file containing you server certificate and
its corresponding private key. Be sure to protect this file.
You may want to move it to a floppy disk and store it somewhere safe from outside disturbance. Keep in mind, if you run a backup on the server, this file may be saved in that backup if it is still on the server.
To convert the .pfx file to a file that your Apache server will understand
Run the following command using OPENSSL:
1. To export the Private key file from the .pfx file
openssl pkcs12 -in filename.pfx -nocerts -out key1.pem
You will be asked for the import password, this was generated in step 6 above, when asked for a RSA password enter the a password (not important as you will be removing it shortly)
(NB. Make sure to append ‘1’ to your key name, all will be come clear later)
2. To export the Certificate file from the .pfx file
openssl pkcs12 -in filename.pfx -clcerts -nokeys -out cert.pem
3. For installation on a Win32 system it is necessary to remove the encryption on the key that you have just generated, run the following command
openssl rsa –in key1.pem –out –key.pem
Now delete the key1.pem file
4. You now need to copy the files to the locations as described in the httpd.conf, this would be c:\program files\apache group\apache2\conf\ssl on a standard win32 apache2 installation
5. Rename the key and the certificate as follows key.pem -> key.key, cert.pem -> cert.crt edit your httpd.conf and your ssl.conf file to suit, this is assuming that you created a self-signed certificate in order to test your apache2 ssl installation. Otherwise please consult my previous documentation on how to add SSL support to Apache2 under win32 for directions on what sections to change.
6. You will now need to restart the http daemon (net stop apache2, net start apache2 from the command line, or use the apache monitor)
Subscribe to:
Posts (Atom)
